How to deploy GitHub pages with AWS Route 53 registered custom domain and force HTTPS
In this guide I will explain how to deploy a website to GitHub pages forcing HTTPS over a custom domain that is registered with AWS Route 53. We will set up our domain so that the www subdomain will redirect to the apex domain.
Summary
- Set up the GitHub repo
- Commit and push an index.html or use Jekyll
- Configure AWS Route 53
Step 1: Create GitHub repo and turn on GitHub Pages
- If it does not exist yet, create a repository using the naming pattern
your-github-username.github.io. Since my username is benwiz my repository is calledbenwiz.github.io. - Click the Settings tab and scroll down the GitHub Pages section
- From the Source dropdown select master branch
- Click Save
Step 2: Push source code to GitHub
- Clone the repo to your local machine
git clone git@github.com:your-github-username/your-github-username.github.io.git && cd your-github-username.github.io
- Create an index.html file with some content
echo "Hello GitHub Pages!" > index.html
- Looking forward, we will need to have a file named CNAME that contains a single row: your custom domain. My CNAME file has the following contents.
benwiz.com
- Push the files to GitHub
git add . && git commit -m 'Create content and CNAME record' && git push
Step 3: Confirm that GitHub pages has been deployed
Visit http://your-github-username.github.io and https://your-github-username.github.io. You should see the contents of your index.html file at both the unsecured and secured addresses.
Step 4: Configure AWS Route 53 to use your custom vanity domain
- Log into the AWS console and go to the Route 53 dashboard.
- Click Hosted zones
- Click the domain you would like to use
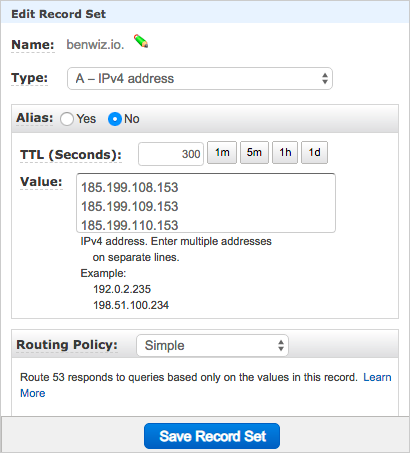
- Click Create Record Set
- Do not enter anything into the Name field
- Under the Type dropdown, select A - IPv4 addresses
- The Alias toggle should be set to No
- Enter the following four IP addresses into the value text area. Then click Save Record Set.
185.199.108.153
185.199.109.153
185.199.110.153
185.199.111.153
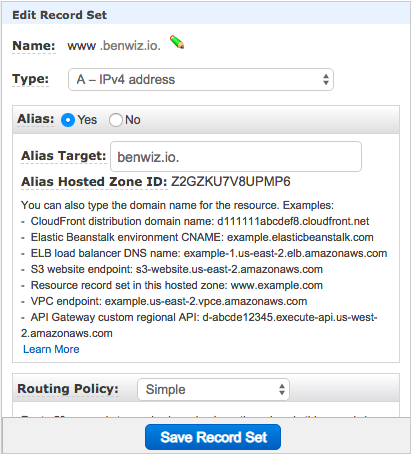
- Click Create Record Set, again
- Into the Name field, enter
www - Under the Type dropdown, select A - IPv4 addresses, again
- The Alias toggle should be set to Yes, unlike before
- In the Alias Target field, select the apex domain we previously set up. For me this is benwiz.com.
- Click Save Record Set, again
Step 5: Configure GitHub to serve over your custom domain
- Return to your GitHub repository’s settings tab
- Scroll down to the GitHub Pages section
- In the Custom domain field enter your custom domain:
your-custom-domain.com - Click Save
- Check Enforce HTTPS
Step 6: Confirm that your page is accessible at your custom domain
- Visit
https://your-custom-domain.com. You should see the contents of your index.html. - Visit
https://www.your-custom-domain.com. You should be redirected tohttps://your-custom-domain.com. - Visit
http://your-custom-domain.com. You should be redirected tohttps://your-custom-domain.com. - Visit
http://www.your-custom-domain.com. You should be redirected tohttps://your-custom-domain.com.